Formative Assesment

Today was the formative assessments with Marcus Oakley and Pete Lloyd, this was to discuss where we are at with the project and what am i going to do over Easter.

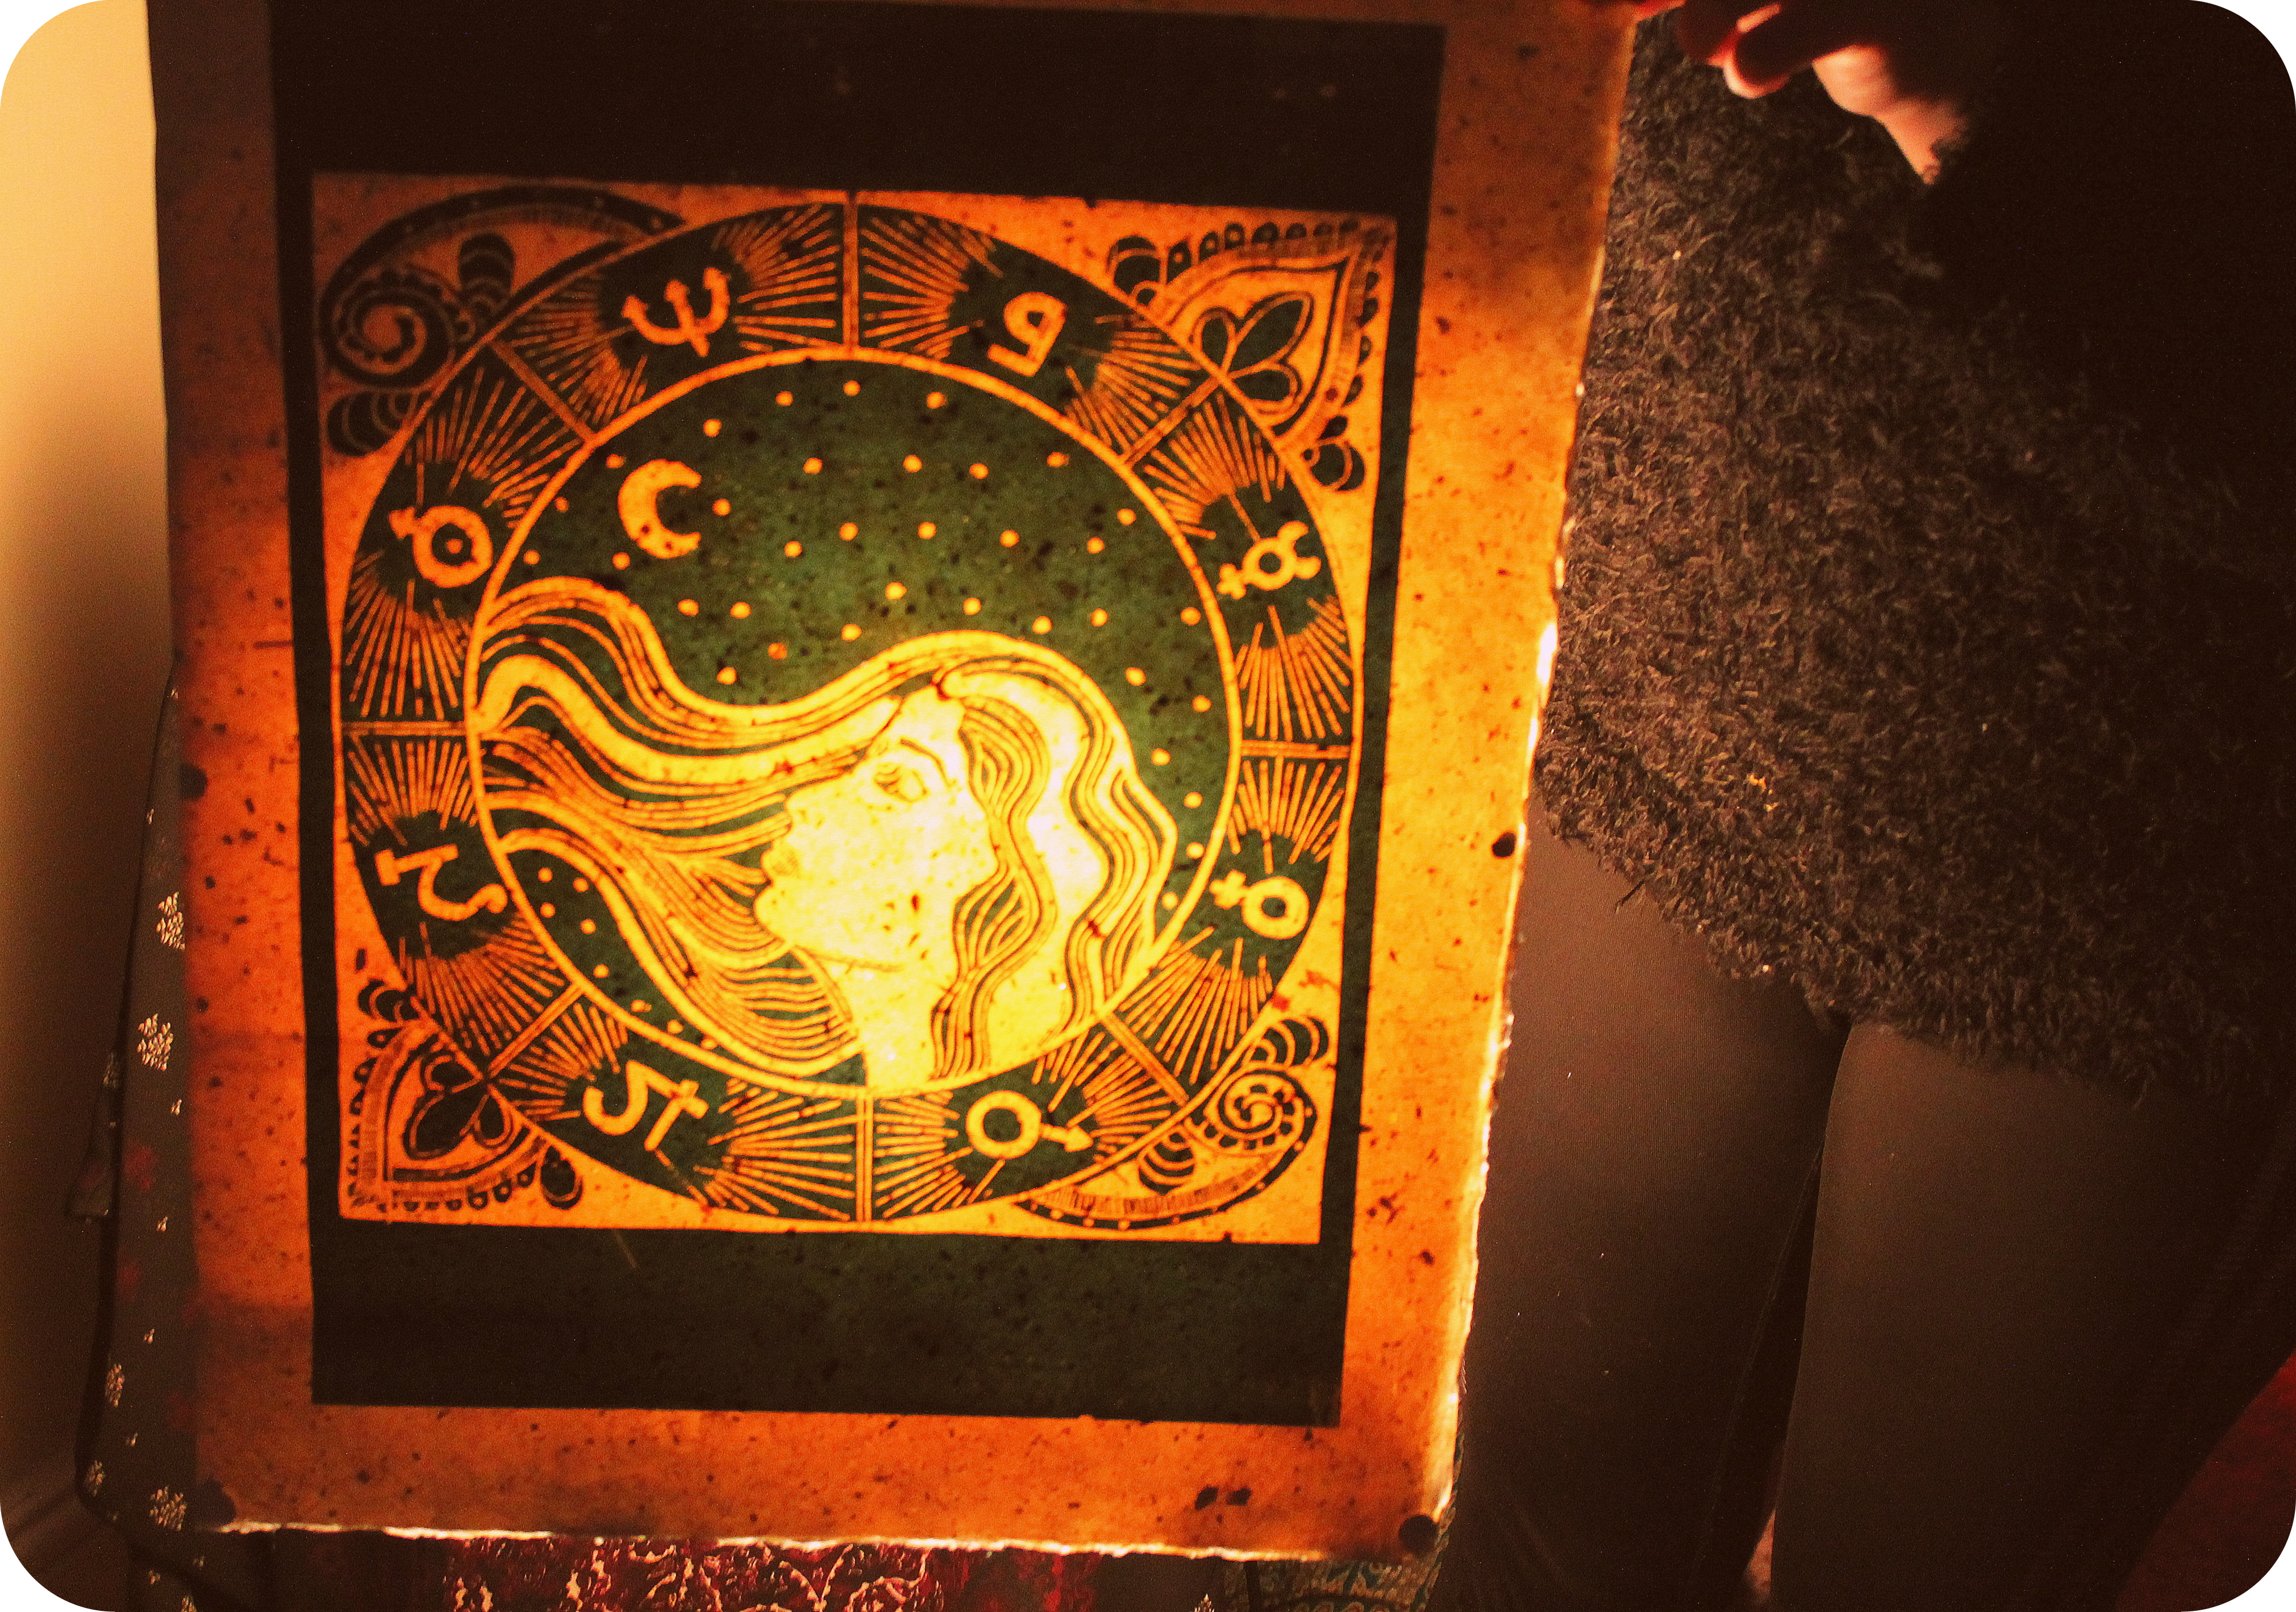
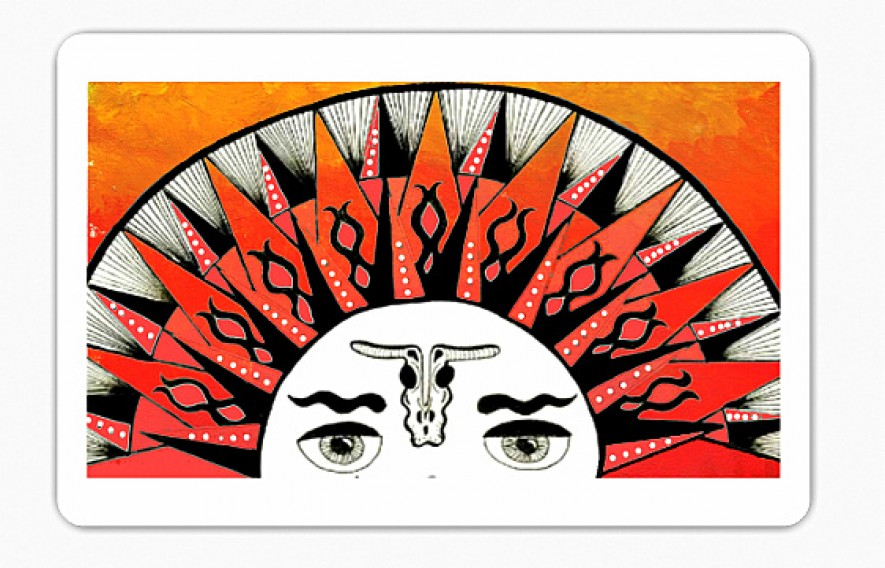
My plan over easter is to laser cut and print my Mother Earth image and also design, laser cut and print 2 more over easter while the print room is quite before the mad rush after easter where everyone panics and decides they all want to use the print room!. Then i will only have one image to produce after Easter.

I like to work calmly and with plans in place so all my work is finished on time with maybe a few days before hand in to properly go through all my work and organise it.

I told Marcus and Pete this plan and they both thought it was good to have a plan like this in place but i should allow for mistakes to happen and not get to bogged down if things don’t go to plan. I rely heavily on the laser cut machine and you can’t pre book time on the machine you can only book time slots when the sign up sheet goes up on monday mornings and have to fight your way to it because we share the machine with graphics and fine art. Its a hot piece of property lately so i worry i won’t get booked in.

I am always in the studio by at least 9.30am in the morning so i am hoping my eagerness to be early and near the sign up sheet will make sure i get my allotted time slots.

Pete liked the idea for my degree show of hanging my pieces but said not to worry too much about that now until my final images are made and just concentrate on getting them designed and printed.

Mother Nature Mini Test Print

Reflecting on my last laser cut ( below)

1922521_10152014226230784_1562784211_n

i wanted to create texture within the print but control the texture and not leave it up to chance so much. Talking to Ben and Matt in the 3D studio they said that this can be achieved by adding a grey background in the illustrator file as shown below

10152385_10152050390550784_1114238319_n

The laser cutter works on a greyscale so will pick this up and only slightly etch it meaning i will get texture in the grey areas and a clear image in the black and white parts.

Now with the illustrator file all ready and prepared it was onto thinking how would this image translate into an A1 image with the laser cutter only being able to cut and etch onto wood A2 size.The image will need to be laser cut and etched onto two different wooden panels and then come together to make one big A1 print. This means cutting my image in half and having each panel having half the image etched into it. I was concerned about there being a join line visible when printing so after brainstorming  i came up with etching and cutting out a mini version of the print in A5 ( as smaller tests take less valuable time up) and testing out a way to hide the join line by cutting it along the bottom circle as demonstrated below

10171301_10152063816420784_3814044575433059_n

This is the A5 laser cut piece and below is the prints i made from this to see if you could see the join line. After my talk with Pete about colours to use i have decided to use colours that are associated with the symbolism for the images. So for Mother Earth image i am using a dark Green which is a nod towards nature.

10151766_10152063816405784_6169604912012317790_n-001 Scan copy

After my talk with Pete about what paper to use i printed these on Japanese paper to give a sense of what the bigger image will look like. I again printed over 10 of these to sell later on in the degree show.As you can see the join line is not noticeable but there is a glaring error with my plan. Each panel can only be A2 no bigger and if i cut the image this way on side will be bigger and not fit in the laser cut machine! whoops.

So back to plan A of just cutting the image in half and hoping the join line does not show to much when printed, Fingers Crossed!

Nick White Tutorial About Degree Show

Up until now i hadn’t really had a good long think about how i want to display my work at the degree show. I know i will have four A1 Prints to show and that i will four laser cut panels to show too possibly, i also know i want the overall effect to be ethereal with lots of light like a stained glass window . I asked Nick White if he had any ideas on the matter. He suggested hanging them freely instead of framing them so they can be seen out in the open, or maybe have them all hanging in a square possible at eye level. Nick advised me to look up other ways other people have shown work and prints and see if i too can emulate anything.

Below is an image i have posted before IMG_0172

This was a light test i did with one of my first preliminary linocuts and to achieve this on a bigger scale i think would look great with my images to have a light beaming from behind it.

As each print will be printed in a different colour corresponding to its symbols and meanings maybe they can be lit up with there corresponding colour like below

images

This can be achieved by hanging them away from a wall and placing led lights behind.

I dont have to make a decision yet as to how the images will be displayed but i will keep any ideas ticking over and constantly be thinking about it in the back of my mind.

Mother Earth Design Take 2

After many decisions and deliberating with adding different symbols  i have finally drawn out a final image for my first Goddess Mother Earth. As i am sure this is my final design i have drawn it out in pen in an A3 sketchpad and will do so with the other designs as well. Drawing in black pen means the black and white contrast is good meaning its easier to photoshop out the paper background behind and the scanner picks up the image better this way. Working in A3 means i can add small detail a lot easier than on a small sketchbook.Below is the process of the final image which took around 6 hours to finish.

IMG_0446

IMG_2394

Image Explained 

Flowers at the bottom: The flowers are too represent the ground that Mother Earth is rooted to and specifically the roses which are a symbol of love and this is Mothers Earth’s love for everything from the ground to the skies.

Deaths hawk Moth:  This represents the life and death cycle of all animals and that Mother Earth controls that and its part of nature and how the universe works.They are placed by her hands as to show she is in control of them.

Seed of life: This represents life and all encompassing. This is what Mother nature nurtures so this is why she is holding on to this. The seed of life is not such a psychical aspect but more of a metaphysical one.

Zodiac and Planets:  The Zodiac and the planets surround the seed of life, i personally am a big believer in the Zodiac and how the planets are aligned to these zodiac symbols. Each one has its own physical and metaphysical meaning. I am a Taurus and the matching planet to this is the Sun and with this certain attributes are linked to these such as being loyal and patient but with a stubborn anger too. These attributes make up how we function as humans and how we connect to one another.

Mountains: At the top lies the mountains and the sky, mountains have long been associated with gods and goddesses and as a symbol for deities. The night sky again is an extension of this symbol with the stars representing other deities under the watchful eye of Mother Earth.

Mother Earth: Here in her symbolic stance she stands holding the planets in place and life and death in her hands with the ground rooted to her. The tattoo on her symbolises The goddess movement which this whole project started from.

All this information has been sourced from my A to Z of Gods and Goddesses book  featured earlier in my blog and the “Symbols” book along with sites such as http://ancienthistory.about.com/ and http://www.goddess-guide.com/

Mother Earth Tutorial With Jonny Hannah

I decided to talk to Jonny about my Mother Earth design and see if he had any other ideas on how i could improve the design and maybe thoughts on my future designs.

Jonny agreed with Pete in saying it was a nice design but for my final images i need to adding even more symbolism to them and not have unnecessary white space.

Jonny suggested that maybe the image could have a “Save The Earth” stance attached to it so maybe adding recycling symbols hidden in the leaves and maybe that she has environmental tattoos on her skin.

I took his comments on board and went back into my sketchbook to see if i could redesign the image with a slightly more environmental twist to the images. However once i started trying to add a recycling element to the image to me it just started to look messy and i was losing the real meaning of my images and loosing the ethereal touch to them so in this instance i scrapped this and went back to redesigning the image with the earth symbols and nature symbolism but just focusing more on the layout and creating more of a complete image. I wouldn’t normally disagree with a tutors comments but this time i had to go with my gut feeling of what i think will work and how i want the images to look.

Mother Earth Sketches

IMG_2305above are my sketches for my mother earth image. As my research was quite thorough with this image i already had a preliminary idea of how i wanted to lay out the images and the symbols. This is why there isn’t a lot of rough sketches and i moved onto drawing out the final design quite quickly. As the weeks are moving along fast being decisive with my images is not such a bad point in my opinion and the faster i get to the printing stage the quicker i can see if i need to make changes and i will still have time to change and edit.

Mother Earth Tutorial With Pete LLoyd

I had my Mother Earth Tutorial and showed Pete my print and he said he liked it but it just wasn’t busy enough and lacked some depth. i mentioned i wanted to create texture in my prints like how this one had texture and he said to ask ben or matt in the 3d room how they did this. Pete suggested thinking about colour and is there a reason for using certain colours. Pete said to just re think the Mother Earth image and to go back into my research and try again.

i will be going back into my drawings and re drawing up my mother earth image.

Mother Earth From Start To Finish

Here is my mother earth print from start to finish with descriptions of the process.

1898211_10152025610755784_456799995_n

This is my hand drawn image in my sketchbook. It is a4 sized because i don’t want to expand into bigger image sizes yet before i am completely sure this is the right design. I will be taking this design and using the laser cutter to etch out my image to then print from it. i am hoping the outcome will be a lot more refined and work better than the lino cutting method.

With this image i then scanned it into photoshop and played around with the levels and inverted the image so that when i print it then prints the correct way.

1898211_10152025610755784_456799995_n

This is the inverted image ready to put through illustrator and turn into a vector image. From the illustrator files i then resize the image to fit the art board that is set to the laser cutter’s size. i then choose the material i want to etch onto so i want to etch onto wood. i have chosen the thinner 3mm wood rather than the 5mm as the thicker wood has a tendency to split and ruin the image.

My A4 image took one hour to etch onto the 3mm wood and the finished product is this below

10009729_10152025610770784_1103041752_n

This is the finished laser cut next to the original image and you can see how accurate to the original image that it is.


1926935_10152025611075784_932261994_n

I decided for now as i have not decided on colour or how colour will be added to my images to just print in black ink and then i can still see how the image prints. I have also not decided on what paper i will be using yet in my final images so for now have just printed on cream paper.

1922521_10152014226230784_1562784211_nHere is the finished print and i printed an edition of 10 of these to sell at our degree show and at the london show too. Any images i  print i will print in editions of 10 or more so my work can be sold at the shows.

I like the finished print and really pleased with the way the image has textured marks around it where the ink has picked up on the wood. With using the wood it warps a bit when laser cut so therefore some of the wood is more raised then other bits causing the roller when inking up to catch slightly on certain points. I like this affect and will look into how i can create this every time not just by chance. I will now show this image to Pete in my tutorial tomorrow and see what he thinks of the image.

Mother Earth Symbolism Continued

220px-Seed-of-Life

“The “Flower of Life” can be found in all major religions of the world. It contains the patterns of creation as they emerged from the “Great Void”. Everything is made from the Creator’s thought.”

http://www.phoenixmasonry.org/sacred_geometry_the_flower_of_life.htm

Above is the Flower of life ( Seed of Life) and I’ve been thinking that this would be a great symbol to add to my final mother earth image. Its symbolism combines nature and the unobtainable dieties and divine goddesss. it is symbolising the seed of life and how it grows and also is encompassed by the earth symbol the circle. This image needs to have a good balance of nature and religious images.

3ff1ca78659341b9cb5ad830fe777300

This image from Pinterest is one i want to emulate in my mother earth image. The goddess is rooted to the ground with nature surrounding her reaching up towards the heavens and all that she protects. Her stance is just like the religious and christian images i researched in churches and on stained glass windows.

1stainedglass-211x300

As i have said before even though these images are depicting goddesses i want them to symbolise ALL religions and encompass as much symbolism from different cultures as possible.

My next post will explore my sketches for the Mother Earth Final Piece and how i am getting along with layouts and merging all the symbols i have researched and carefully selecting the most successful symbols to create my image. This will be hard for me as i find it hard to edit my research and bring lots of images together to create a well constructed image.

Mother Earth Research

After deciding on what goddesses to depict i now started focusing my research more and starting to pick symbols to put in my final images. Below is some of the symbolism and research i have been collecting as inspiration for my Mother Earth image

 “Gaia represents forces of nature: laws and intelligences that function on every level of the cosmos”

http://gnosticteachings.org/the-teachings-of-gnosis/lectures-by-gnostic-instructors/1651-nature-and-the-divine-mother.html

Above is a description of Mother Earth that i want to capture in my image and i want to show elements of the forces of nature. Below are images that have inspired me

23394ff74da32a0922530799ce3cae35 9f1589650b2dee1143d2094b25f10702 9adefad8119698128e8341928586816a 7017039b044d12bf950a7e0b854f06f5

I’ve been thinking about these images and i like that in each image nature is obvious and present. In the second image i like how the planets have been incorporated. Thinking about what symbolism i will put in my Mother Earth image i don’t want the symbols to be too obvious. I want the viewer to have to think about what the image means.

earthsymbol

This is the astronomical symbols for earth and i like the idea of incorporating this into my image in a subtle way.Mother earth is all encompassing and this symbol reflects that. In the last image with the mother earth and louts flower she is surrounded by circles and this is a great way to incorporate the sense of all encompassing and how Mother Earth surrounds us.

I will keep thinking and researching and drawing out ideas as to how i can incorporate lots of symbolism and create an ethereal image to represent Mother Earth.